You have a WMV file. You want it on YouTube. You try to upload it and either it fails entirely or the quality comes back worse than expected.
YouTube does not recognize the encoding in the audio and video streams of WMV files. To successfully upload WMV videos to YouTube, you have to convert them to a YouTube-supported format first.
The fix is straightforward. Convert to MP4 with H.264 video and AAC audio. Every method below does exactly that — the differences are in control, speed, and whether you need to install anything.
Why WMV Causes Problems on YouTube
WMV — Windows Media Video — is a Microsoft proprietary format. WMV is a container developed by Microsoft and best used for PC machines. Compared to MP4, WMV files are usually larger and have less compatibility.
WMV can’t be played on iPhones, iPads, PS4s, PS3s, or any devices that aren’t running Windows. When you try to play a WMV file in QuickTime, Final Cut, or iMovie, it always fails.
YouTube’s encoder is optimized for H.264 and H.265 inside MP4 containers. WMV uses the Windows Media Video codec — a different compression standard that YouTube’s upload pipeline handles inconsistently. The result: failed uploads, poor transcoding quality, or audio sync issues after processing.
Converting to MP4 H.264 before uploading puts YouTube’s encoder in the most favorable position. The re-encoding pass is lighter and the viewer-facing quality is better.
The Right Export Settings for YouTube After Conversion
Before the methods — knowing what you’re converting to matters as much as the tool you use.
YouTube’s recommended settings for standard delivery:
| Setting | Recommended Value |
|---|---|
| Container | MP4 |
| Video codec | H.264 |
| Audio codec | AAC-LC |
| Resolution | Match source — 1080p or higher preferred |
| Frame rate | Constant — match source |
| Bitrate | 8–12 Mbps for 1080p |
| Audio bitrate | 384 kbps |
| Color space | Rec. 709 |
One important note: the conversion process might cause picture quality to decrease. To minimize quality loss, use the same resolution and bitrate as your source WMV file, or choose a lossless intermediate format like MKV before final delivery.
Method 1: TotalMedia VideoConverter — Web App and Desktop
TotalMedia VideoConverter handles WMV to MP4 conversion directly with a YouTube preset that automatically applies the correct codec, resolution, and bitrate settings.
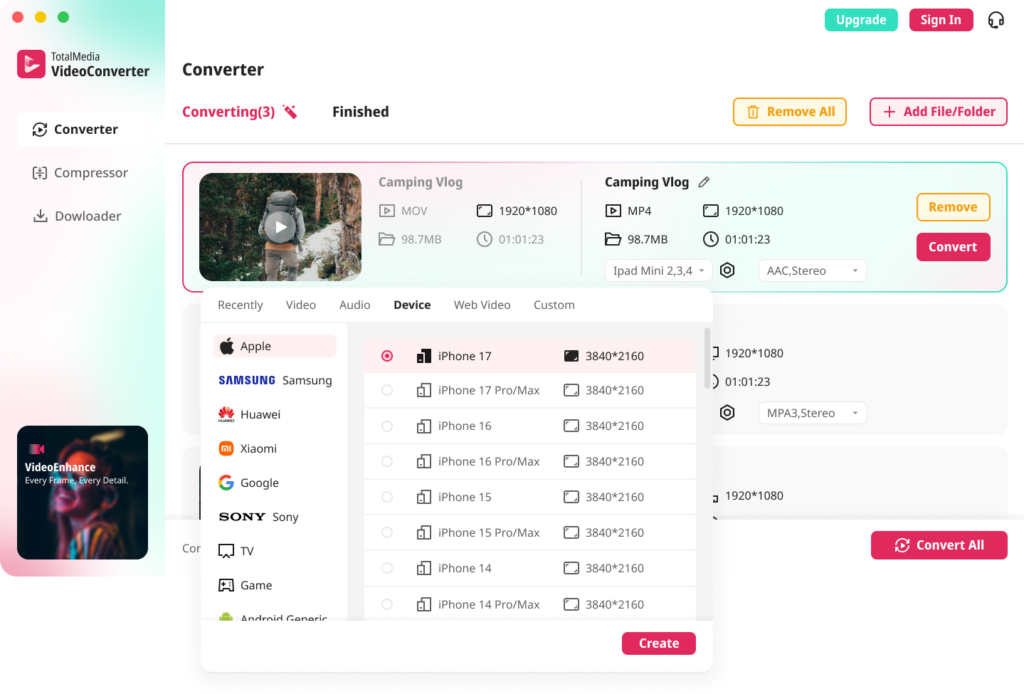
- Open TotalMedia VideoConverter and click Converter in the left sidebar
- Add your WMV file — drag and drop or use Add File
- Click the Web Video tab and select the YouTube preset
- For custom control, open Custom Settings — confirm H.264 encoder, match source resolution, set bitrate to 8–12 Mbps for 1080p
- Set output folder and click Convert
For multiple WMV files — a library of old Windows Movie Maker projects, corporate archive footage, or screen recordings — batch processing converts the entire folder in one session with consistent output settings. Available as both a desktop application and a web app. No installation required for the browser version.

Method 2: HandBrake — Free, No File Size Limits
HandBrake is free, open-source, and handles WMV conversion reliably. No watermarks, no file size limits, no restrictions.
- Download HandBrake from handbrake.fr
- Open HandBrake and load your WMV file via File under Source Selection
- Under Presets, select Fast 1080p30 as a starting point
- Go to the Video tab — confirm encoder is H.264
- Under Audio, set codec to AAC and bitrate to 192kbps minimum
- Under Summary, confirm output is MP4
- Click Start Encode
HandBrake is a free and open-source tool for converting WMV files — one of the most reliable options available at no cost.
One note: HandBrake outputs only MP4, MKV, and WebM. For WMV to MP4 specifically, this is not a limitation — MP4 is exactly what you need.
Method 3: VLC — Already Installed, No Download Needed
VLC handles basic WMV to MP4 conversion without additional software.
- Open VLC and click Media in the top left
- Select Convert/Save
- Click Add, select your WMV file, then click Convert/Save
- Click the settings icon next to the profile dropdown
- Under Video Codec, confirm H.264 encoding
- Under Audio Codec, confirm AAC
- Save the profile, set output file name and location
- Click Start
VLC is the zero-effort option for users who don’t want to install anything new. The output quality is adequate for most WMV files. For large batch conversions or files requiring precise bitrate control, HandBrake or TotalMedia VideoConverter produces more consistent results.
Method 4: Online Tools — No Install, Works on Any Device
Browser-based converters handle one-off jobs without software installation.
FreeConvert supports WMV to MP4 conversion with fine-tuning via Advanced Settings. Files are protected with 256-bit SSL encryption and automatically deleted after a few hours. Free tier handles files up to 1GB.
Clideo provides a straightforward conversion process — upload the WMV file, select MP4 as the output format, adjust settings as needed, and download the converted file. Free tier available.
CloudConvert supports converting WMV files from local storage, video URLs, Google Drive, Dropbox, and OneDrive. It lets you customize video codec, resolution, aspect ratio, FPS, audio codec, audio bitrate, channels, and volume. Free tier includes limited conversion minutes per day.
The practical limitation: online converters work well for small files but struggle with larger ones. For WMV files over 500MB, a desktop tool is faster and more reliable.
Method 5: Windows Photos App — Built Into Windows 11
Windows 11 includes a basic video editor in the Photos app that handles WMV to MP4 export without third-party tools.
- Open the Photos app on Windows 11
- Click the Video Editor tab
- Create a new video project and import your WMV file
- Add the clip to the storyboard
- Click Finish Video and select video quality — High, Medium, or Low
- Export — Photos saves as MP4 automatically
This is the lowest-friction option for Windows users with simple WMV files. Quality control is limited compared to dedicated tools — no manual bitrate setting — but for basic conversion to a YouTube-uploadable format, it works.

After Converting: Uploading to YouTube
Once your MP4 is ready, the upload process is standard. A few things worth confirming before uploading:
Check the file plays correctly first. Open the converted MP4 in VLC or Windows Media Player before uploading. If it plays cleanly locally, it will upload correctly.
Confirm constant frame rate. Variable frame rate causes audio drift after YouTube’s re-encoding. If your source WMV contained VFR content, re-encode with constant frame rate explicitly set in HandBrake or TotalMedia VideoConverter.
Upload at the highest resolution available. YouTube produces better viewer-facing quality from higher-resolution uploads even when viewers watch at lower settings. If your WMV source is 1080p, convert and upload at 1080p. Don’t downscale before uploading.
Add metadata before publishing. Title, description, tags, and thumbnail make the video discoverable. YouTube begins processing immediately after upload — add all metadata before setting visibility to public.
Frequently Asked Questions
YouTube does not recognize the encoding in the audio and video streams of WMV files. Convert to a YouTube-supported format — MP4 with H.264 video and AAC audio — before uploading. Most WMV upload failures are codec compatibility issues that disappear after conversion.
Converting WMV to MP4 might cause some picture quality decrease — however, it’s such a small amount that it’s not noticeable when using the same resolution and bitrate as the source. Convert at a matching or higher bitrate than your source WMV to minimize visible quality loss.
HandBrake is the best free desktop option — no file size limits, no watermarks, full bitrate control, available on Windows and Mac. For browser-based conversion without installation, FreeConvert and CloudConvert handle files up to 1GB on free tiers. For a tool that also handles batch conversion and YouTube presets, TotalMedia VideoConverter’s web app requires no installation.
WMV can’t be played in QuickTime, Final Cut, or iMovie on Mac without additional software. HandBrake has a Mac version that handles WMV to MP4 conversion. TotalMedia VideoConverter’s web app runs in Safari or any Mac browser without installation. VLC for Mac also handles the conversion through its Convert/Save function.