The Sony Bravia manual says AVI is supported. You plug in the USB drive. The file shows up. You hit play.
“Playback not available.”
This is one of the most consistent complaints across Sony Bravia owners — and the answer isn’t what most people expect. AVI support on Sony Bravia is real but conditional. The container format isn’t the problem. What’s inside it is.
Why AVI Files Fail on Sony Bravia TV
AVI is a container format. It holds video and audio encoded with various codecs — and Sony Bravia HDTVs that are capable of playing AVI video files are only compatible with videos encoded in the H.264 or MPEG4 video format. If an AVI file is not in the H.264 or MPEG4 format, it will not work on the Sony Bravia HDTV.
Most AVI files in the wild use DivX, Xvid, or other MPEG-4 variants that Sony Bravia handles inconsistently. Older AVI files from DVD rips commonly use codecs that trigger the “playback not available” error even though the container format itself is listed as supported.
Three specific causes:
Wrong video codec. Sony Bravia TV is capable of playing AVI video files, but only for those that are encoded in the H.264 or MPEG4 video format. Xvid, DivX older than DivX Home Theater 3.0, WMV inside AVI, and other variants fail on most Bravia models.
Wrong audio codec. USB-enabled Sony Bravia HDTVs can only play audio in the MP3, AAC and MPEG4-AAC formats. If an AVI file has an audio track that is not in these formats, it will not be compatible for playback. If the AVI file does play on the Bravia TV, it will play without the audio track. AC3 and DTS audio inside AVI files are the most common audio causes of silent playback.
USB drive formatted incorrectly. Make sure the drives you are using are formatted in the FAT32 file system, as FAT32 drives work best with the Sony Bravia USB interface. Files larger than 4GB are only supported when using the exFAT file system. NTFS drives are not reliably supported for media playback on all Bravia models.
How to Check What’s Inside Your AVI File
Before converting, verify whether conversion is actually needed. The problem might be audio only — in which case a faster remux fixes it without full re-encoding.
Download MediaInfo — free, available on Windows and Mac. Open your AVI file in MediaInfo and check two things: the video codec listed under Video, and the audio codec listed under Audio.
If video shows H.264 or MPEG-4 and audio shows AAC or MP3 — the file should play. Try a different USB drive or reformat the current one.
If video shows Xvid, DivX, WMV, or anything other than H.264 or MPEG-4 — convert the video codec.
If audio shows AC3, DTS, or any format outside MP3 and AAC — re-encode the audio track at minimum.
This check takes two minutes and tells you exactly what needs fixing.
The Safe Target Format for Sony Bravia USB Playback
The combination that plays on every Sony Bravia model without exception:
| Setting | Safe Value |
|---|---|
| Container | MP4 |
| Video codec | H.264 |
| Audio codec | AAC |
| Resolution | Match source |
| Frame rate | Constant — match source |
| Bitrate | 8–15 Mbps for 1080p |
| USB file system | FAT32 (under 4GB) or exFAT |
MP4 with H.264 and AAC is more reliable than AVI with H.264 and AAC on Sony Bravia — even when both codecs are supported. Converting to MP4 eliminates the container-level inconsistencies that cause some technically compatible AVI files to fail.
Method 1: TotalMedia VideoConverter — Sony Device Preset
TotalMedia VideoConverter includes a Sony TV device preset that automatically applies the correct codec, resolution, and audio settings.
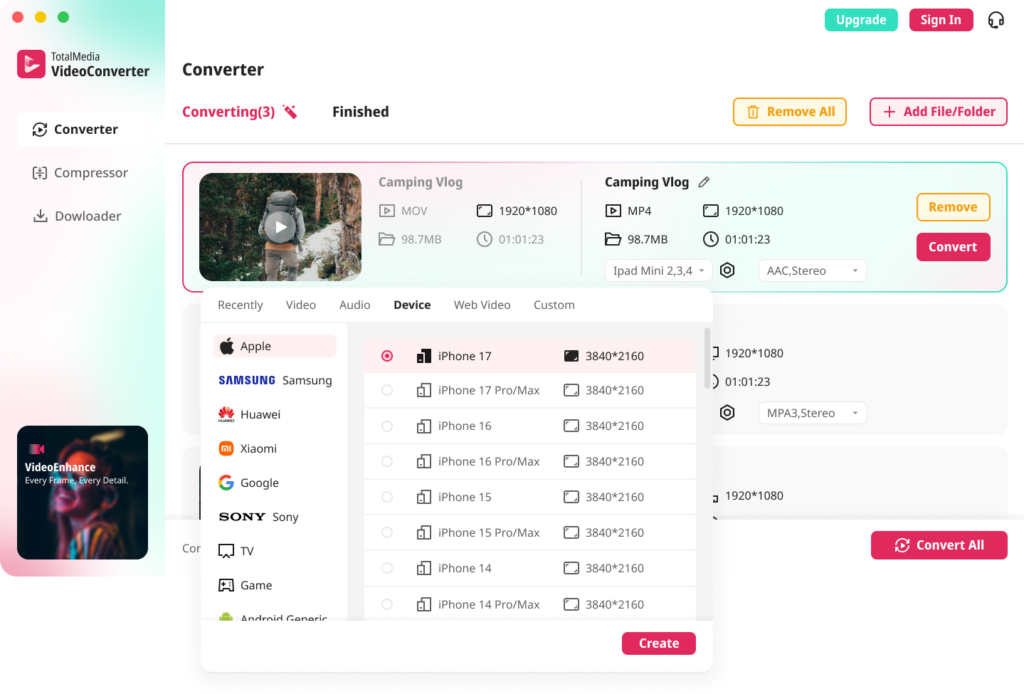
- Open TotalMedia VideoConverter and click Converter in the left sidebar
- Add your AVI file — drag and drop or use Add File/Folder for batch conversion
- Click the Device tab and navigate to Sony — select the Bravia preset
- For manual control, open Custom Settings — confirm encoder is H.264, audio codec is AAC, resolution matches source
- Set output folder and click Convert
For a library of AVI files — old DVD rips, downloaded movies, archival footage — batch processing converts the entire folder in one session with consistent output settings. Available as both a desktop application and a web app. No installation required for the browser version.
Method 2: HandBrake — Free, No File Size Limits
HandBrake can handle AVI to MP4 conversion reliably on Windows and Mac.
- Download HandBrake from handbrake.fr
- Load your AVI file via File under Source Selection
- Under Summary, confirm output format is MP4
- Go to the Video tab — confirm encoder is H.264
- Go to the Audio tab — set codec to AAC, bitrate to 192kbps. Remove any AC3 or DTS tracks
- Under Dimensions, confirm resolution matches source
- Click Start Encode
Set the audio to AAC at 160kbps bitrate. These settings work on Sony TV. For surround sound, add an AC3 passthrough track alongside the AAC stereo track — Bravia models that support AC3 will use it, others fall back to AAC.
Method 3: VLC — Remux Only, No Re-encoding
If MediaInfo confirms the video codec is already H.264 or MPEG-4 and only the audio needs fixing, VLC can remux without re-encoding — much faster than a full conversion.
- Open VLC and click Media, then Convert/Save
- Add your AVI file and click Convert/Save
- Select a profile with H.264 video and AAC audio
- Click the profile settings icon — under Audio Codec, switch to AAC if not already set
- Set output file with .mp4 extension
- Click Start
No re-encoding means no quality loss on the video track. The process completes in seconds rather than minutes. Only use this method when the video codec is already compatible — VLC remux won’t fix an incompatible video codec.
Method 4: Online Tools — No Install Required
Browser-based converters handle one-off conversions without software installation.
CloudConvert supports AVI to MP4 with custom codec, resolution, and audio settings. Free tier includes limited conversion minutes per day.
FreeConvert handles files up to 1GB on the free tier. Set output to MP4, confirm H.264 video and AAC audio, download. Straightforward for standard AVI files.
For files over 500MB or batch conversion of large libraries, a desktop tool is faster and more reliable than browser-based tools.
USB Drive Setup for Sony Bravia
The correct file system is as important as the correct video format.
USB supported file systems are FAT12, FAT16, FAT32, and exFAT. Files larger than 4GB are only supported when using the exFAT file system.
For files under 4GB: format as FAT32 — the most compatible option across all Bravia model years.
For files over 4GB: format as exFAT. FAT32’s 4GB per-file limit blocks large 1080p and 4K files from transferring at all.
How to access media on Sony Bravia via USB:
- Connect USB drive to the USB port on the side or back of the TV
- Press the HOME button on the remote
- Navigate to Apps or Media
- Select Media Player or Video — depending on your Bravia model year
- Select the USB device and find your video file
To find out what video formats your specific Sony Bravia TV supports, visit sony.co.uk/electronics/support/televisions-projectors, select your TV model, navigate to Manuals, then Help Guide, then Using the TV with Other Devices, then USB devices, then Supported files and formats, then Videos. Format support varies by model year — checking your specific model takes two minutes.
Troubleshooting Guide
| Problem | Cause | Fix |
|---|---|---|
| “Playback not available” | Wrong video or audio codec | Convert to MP4 H.264 with AAC audio |
| File plays video but no audio | AC3 or DTS audio — not supported | Re-encode audio track to AAC |
| USB drive not recognized | Wrong file system | Reformat to FAT32 or exFAT |
| File shows in list but won’t open | Corrupt AVI header | Re-mux in VLC or convert to MP4 |
| Some AVI files play, others don’t | Different codecs inside same container | Check each file in MediaInfo — codec varies |
| File over 4GB won’t transfer to USB | FAT32 file size limit | Reformat USB drive to exFAT |
| No video files appear at all | TV model doesn’t support USB video | Check model manual — some budget Bravia models have no USB video support |
Frequently Asked Questions
If your Sony Bravia TV failed to play some AVI files, it may be due to the video or audio codecs, resolution, or file system of the USB drive. The most common cause is an unsupported video codec inside the AVI container — most AVI files use Xvid or DivX rather than H.264. Converting to MP4 with H.264 video and AAC audio resolves the error on all Bravia models.
According to Sony’s official site, Sony TVs support MPEG, MTS, M2TS, and MP4 formats through USB. For AVI files specifically, Sony Bravia HDTVs are only compatible with videos encoded in the H.264 or MPEG4 video format with MP3, AAC, or MPEG4-AAC audio. MP4 with H.264 and AAC is the safest combination across all model years.
USB-enabled Sony Bravia HDTVs can only play audio in MP3, AAC, and MPEG4-AAC formats. If an AVI file has an audio track not in these formats, it will play without audio. AC3 and DTS audio are the most common causes. Re-encode the audio track to AAC using HandBrake or TotalMedia VideoConverter to restore sound.
Sony Bravia TVs support FAT12, FAT16, FAT32, and exFAT file systems. Files larger than 4GB are only supported when using the exFAT file system. Format as FAT32 for files under 4GB — maximum compatibility across all model years. Format as exFAT for files over 4GB.