
Why TikTok Compresses Every Video You Upload
There is no way around it — TikTok re-encodes every single video uploaded to the platform. It does not matter how high your source quality is, what codec you used, or how carefully you exported. TikTok runs every upload through its own transcoding pipeline and outputs the version it serves to viewers.
This is not a bug. It is infrastructure. TikTok serves billions of videos to billions of devices across every possible network condition — from 5G to 2G. Standardizing every video into its own optimized format is how the platform keeps delivery fast and consistent at scale.
What you can control is the source material you give TikTok to transcode from. A high-quality, correctly formatted source produces significantly better output than a poorly encoded or incorrectly sized upload. The gap between a good TikTok upload and a bad one is entirely in what happens before you hit the upload button.
The core principle: TikTok compression is inevitable. Quality loss is not. Giving TikTok the right source file — correct codec, resolution, bit rate, and aspect ratio — is what separates crisp, professional-looking content from the blurry, over-compressed videos that frustrate creators every day.
What TikTok Actually Does to Your Video
When you upload a video to TikTok, the platform runs it through a multi-stage processing pipeline:
Stage 1 — Format normalization: TikTok converts your upload to its internal format regardless of what you uploaded. MP4, MOV, or anything else gets transcoded.
Stage 2 — Resolution scaling: TikTok scales your video to fit its delivery resolutions. If your upload does not match TikTok’s native resolution targets, scaling artifacts can appear.
Stage 3 — Bit rate reduction: TikTok significantly reduces the bit rate of every video for delivery. A 15 Mbps upload might be served to viewers at 2–4 Mbps. This is where most visible quality loss occurs — fine detail, sharp edges, and fast motion all suffer at low bit rates.
Stage 4 — Multi-resolution encoding: TikTok encodes multiple quality tiers from your upload — low quality for slow connections, higher quality for fast connections. The quality of each tier depends on the source you provided.
The implication: TikTok’s transcoding introduces some quality loss no matter what. But the better your source, the better every tier it produces. A 1080p H.264 source at 15 Mbps gives TikTok far more to work with than a 720p source at 4 Mbps — and the difference is visible on screen.

The Seven Reasons Your TikTok Videos Look Bad
Understanding why quality degrades points directly to the fix.
1. Resolution Too Low
TikTok’s primary delivery format for vertical video is 1080×1920. Uploading at 720p or lower forces TikTok to upscale — which adds blur and softness. Always upload at 1080p minimum. For 4K source footage, uploading at 4K gives TikTok a richer source even though most viewers see 1080p.
2. Bit Rate Too Low in the Upload File
TikTok needs bit rate headroom to transcode from. If your upload file is already heavily compressed — low bit rate, visible artifacts — TikTok’s transcoding compounds the existing degradation. Upload at the highest practical bit rate for your file size constraints.
3. Wrong Codec
TikTok’s pipeline is optimized for H.264. Uploading in H.265, VP9, AV1, or unusual codecs forces TikTok to do more work during transcoding — and the output quality is less predictable. H.264 gives TikTok the cleanest, most compatible starting point.
4. Incorrect Aspect Ratio
Uploading a 16:9 horizontal video to a 9:16 vertical platform forces TikTok to add letterboxing or reframe automatically. Either result looks worse than a natively vertical upload. Always prepare vertical 9:16 content for TikTok specifically.
5. Frame Rate Mismatch
TikTok handles 24, 25, 30, and 60fps cleanly. Unusual frame rates — 23.976, 29.97, or 50fps — can cause TikTok’s pipeline to introduce frame drops or motion judder during transcoding. Match your output to a clean integer frame rate before uploading.
6. Uploading Over a Slow Connection
TikTok’s upload progress bar can mislead — a video that uploads successfully over a poor connection may not have transferred cleanly. Incomplete or corrupted uploads produce degraded output or processing errors. Upload on a stable Wi-Fi connection, not mobile data.
7. Uploading a Pre-Compressed File
Exporting from an editor, then compressing for social media, then re-compressing again before TikTok applies its own compression is three generations of lossy encoding on the same footage. Every re-encode degrades quality further. The ideal workflow: export once from your editor at high quality, then upload directly to TikTok.
The Optimal TikTok Upload Settings
These settings give TikTok the best possible source to transcode from — minimizing the visible quality gap between your original footage and what viewers see.
| Setting | Optimal Value | Why It Matters |
|---|---|---|
| Container | MP4 | TikTok’s preferred format — fastest processing |
| Video codec | H.264 | Native to TikTok’s pipeline — most predictable output |
| Audio codec | AAC | Required for clean audio processing |
| Resolution | 1080×1920 (9:16) | Native TikTok vertical resolution |
| Frame rate | 30fps or 60fps (integer only) | Avoids frame drop artifacts in transcoding |
| Video bit rate | 10–15 Mbps | High enough for quality headroom, within upload limits |
| Audio bit rate | 192–320 kbps | Preserves audio quality through TikTok’s pipeline |
| Color space | Rec. 709 | TikTok’s native color space — prevents color shifts |
| Aspect ratio | 9:16 | Native vertical — no letterboxing or reframing |
How to Export From Your Editor With TikTok in Mind

The settings above need to be applied at the export stage — before your file ever reaches TikTok. Here is how to do it in the most common editors.
Adobe Premiere Pro
- Go to File > Export > Media.
- Set Format to H.264.
- Under Preset, select Match Source — High Bitrate as a starting point.
- Click Video tab. Set Target Bitrate to 10–15 Mbps and Maximum Bitrate to 15 Mbps. Enable Use Maximum Render Quality.
- Under Basic Video Settings, confirm resolution is 1080×1920 and frame rate is 30 or 60.
- Click Export.
DaVinci Resolve
- Go to the Deliver page.
- Under Render Settings, select Custom.
- Set Format to MP4 and Codec to H.264.
- Set Resolution to 1080×1920 and Frame Rate to 30 or 60.
- Set Quality to Restrict to and enter 15000 kbps (15 Mbps).
- Click Add to Render Queue and then Render All.
Final Cut Pro (Mac)
- Go to File > Share > Master File.
- Set Format to Video and Audio, Video Codec to H.264, and Resolution to 1080×1920.
- Under Roles, confirm all roles are included.
- Click Next and save.
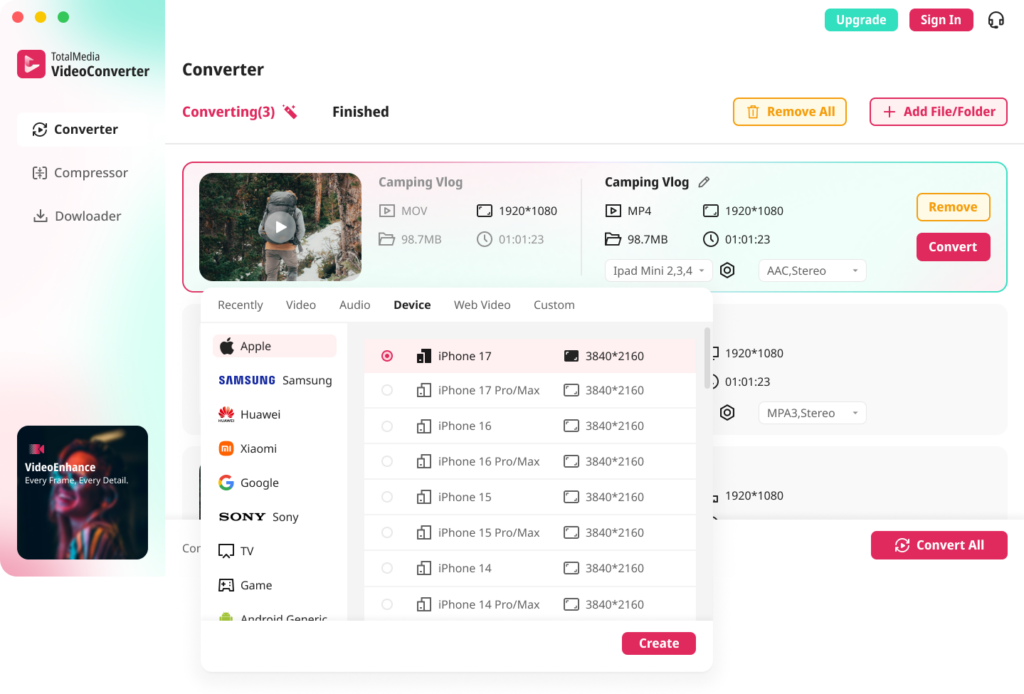
How to Prepare Existing Files for TikTok Using TotalMedia VideoConverter
If your source footage is not from a timeline export — converted clips, downloaded videos, or files from older cameras — TotalMedia VideoConverter prepares them for TikTok upload with the right settings on both Mac and Windows.
Converting and optimizing for TikTok
- Open TotalMedia VideoConverter and click Converter in the left sidebar.
- Click + Add File/Folder and select your video file or folder of clips.
- In the right panel, select the Video tab and choose MP4 as the output format.
- Click the settings gear to open Custom Settings.
- Set the encoder to H.264.
- Set the resolution to 1080×1920 for native vertical output, or keep the source resolution if reframing in CapCut or TikTok’s editor afterward.
- Set the frame rate to 30 or 60 — avoid fractional frame rates.
- Set the bit rate to 10–15 Mbps for 1080p output.
- Set audio codec to AAC at 192–320 kbps in the Audio Settings panel.
- Save the configuration as a named preset — for example, “TikTok Upload Optimized” — for consistent reuse.
- Set output folder via Save to and click Convert All.
- Monitor real-time progress in the dashboard. Find converted files in the Finished tab when complete.
Checking file size before uploading
After conversion, verify the file size against TikTok’s upload limits — 287.6MB for iOS app, 72MB for Android app, 4GB for web upload. If the converted file exceeds your target:
- Click Compressor in the left sidebar.
- Click + Add File for AI Compression and select your converted MP4.
- Select Reduce File Size from the Compress to dropdown.
- Check the real-time file size preview before committing — confirm the predicted output falls within your upload limit.
- Click Compress and verify the result in the Finished tab.
The TikTok Quality Checklist Before Every Upload
Run through this before hitting upload. Each item is a potential quality loss point.
- File format is MP4
- Video codec is H.264
- Audio codec is AAC
- Resolution is 1080×1920 (9:16 vertical)
- Frame rate is 30fps or 60fps (integer, not fractional)
- Video bit rate is 10–15 Mbps
- File size is within your upload method’s limit
- Color space is Rec. 709
- Upload connection is stable Wi-Fi, not mobile data
- File has not been re-compressed multiple times
What to Do When TikTok Quality Is Still Poor After Upload
Even with perfect upload settings, TikTok sometimes serves lower quality for up to 24 hours after a new upload while the full resolution version processes. Before re-uploading or re-encoding, rule out these platform-side issues first.
Wait for full processing. TikTok processes lower resolutions first. A video may initially show only at 360p or 540p. Full 1080p typically processes within 30 minutes to a few hours. Check the video quality selector in the player — if higher quality options are not available yet, it is still processing.
Check on a different device. TikTok sometimes serves lower quality to older devices or slower connections. Check the same video on a newer phone or desktop browser to confirm whether the quality issue is platform-wide or device-specific.
Check your account’s upload history. Some accounts — particularly new accounts — receive lower default quality tiers until they establish upload history. This improves over time.
Delete and re-upload at optimal settings. If the quality is consistently poor across devices and the processing window has passed, delete the post, verify your settings using the checklist above, and re-upload. Do not upload the same file — start from the original source and re-export at the correct settings.
Does TikTok Offer a High Quality Upload Mode?
TikTok has tested and partially rolled out a “Upload HD” toggle in some regions and account types. When available, this option appears in the upload screen and tells TikTok to prioritize higher-quality processing for the file.
Enabling it does not bypass TikTok’s transcoding — it simply signals the platform to use a higher bit rate output tier. The upload still gets re-encoded. The quality ceiling is still set by your source file. Uploading a low-quality source with HD mode enabled does not produce a high-quality output.
HD mode is most effective when combined with the optimal upload settings covered in this guide — not as a substitute for them.
FAQ
TikTok re-encodes every uploaded video to serve it efficiently across billions of devices and varying network conditions worldwide. This is a platform infrastructure decision — not something creators can disable. What creators can control is the quality of the source file they provide. A high-quality, correctly formatted upload gives TikTok better material to transcode from, producing visibly better output for viewers.
Upload MP4 files with H.264 video encoding, AAC audio, 1080×1920 resolution at 9:16 aspect ratio, 30fps or 60fps frame rate, and 10–15 Mbps video bit rate. These settings align with TikTok’s transcoding pipeline and give the platform the best possible source to work from — minimizing visible quality loss in the final output viewers see.
TikTok serves different quality tiers based on device capability and connection speed. A video that looks sharp on your phone may be served at a lower tier to viewers on slower connections or older devices. This is platform behavior — ensuring your upload meets the optimal specs gives TikTok the best source to produce all quality tiers from, improving the experience across all devices.
Converting older video files for TikTok? Read our guide on how to convert AVI to MP4 for TikTok for step-by-step format conversion and reframing instructions.