
Why Premiere Pro Won’t Open Your MP4
MP4 is not a single format — it is a container. Think of it as a box that can hold many different types of video and audio codecs inside. Premiere Pro opens the box fine but may not be able to read what is inside it.
When an MP4 fails to import or play in Premiere Pro, the cause almost always falls into one of three categories:
- Unsupported or hardware-limited codec — most commonly H.265 (HEVC)
- A file that looks like an MP4 but isn’t — wrong extension, unusual encoding
- A corrupted file — damaged during recording, transfer, or storage
Each has a different fix. Identifying the right cause first saves you from trying solutions that won’t work.
Quick diagnosis: If Premiere shows an error message mentioning “codec” or “unsupported format,” start with the codec section. If the file simply won’t import at all with no clear error, check for corruption. If the file plays in one player but not Premiere, it is almost certainly a codec issue.
Cause 1: Unsupported or Hardware-Limited Codec
Why H.265 Causes Most MP4 Import Failures
H.265 (HEVC) is the most common reason MP4 files fail in Premiere Pro. Modern cameras — including smartphones, drones, mirrorless cameras, and action cameras — default to H.265 for 4K and high-bitrate recording because it delivers better quality at smaller file sizes.
Premiere Pro does support H.265, but with conditions:
- H.265 decoding in Premiere Pro relies heavily on hardware acceleration. Without a compatible GPU or CPU with hardware decoding support, Premiere either refuses the file or plays it with severe lag.
- On Windows, H.265 playback also requires the HEVC Video Extensions codec pack from Microsoft. Without it, Premiere cannot decode H.265 files regardless of your hardware.
- Older versions of Premiere Pro have limited or no H.265 support.
Fix 1A: Install HEVC Video Extensions (Windows)
On Windows 10 and 11, open the Microsoft Store and search for HEVC Video Extensions. The official Microsoft version costs a small fee. A free alternative — HEVC Video Extensions from Device Manufacturer — is sometimes available depending on your system.
After installing, restart Premiere Pro and try importing again.
Fix 1B: Enable GPU Acceleration in Premiere Pro
- Go to File > Project Settings > General.
- Under Video Rendering and Playback, set Renderer to Mercury Playback Engine GPU Accelerated.
- Click OK and try importing again.
If GPU acceleration is already enabled and H.265 still fails, your GPU may not support hardware H.265 decoding. In this case, converting to H.264 is the most reliable path forward.
Fix 1C: Convert H.265 to H.264 Before Editing
Converting your MP4 from H.265 to H.264 is the cleanest and most permanent fix. H.264 is natively supported in every version of Premiere Pro, on every system, without hardware requirements.
Using TotalMedia VideoConverter:
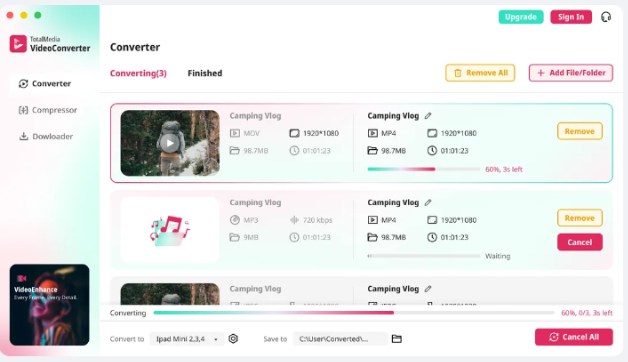
- Open TotalMedia VideoConverter and click Converter in the left sidebar.
- Click + Add File/Folder and select your MP4 file or the entire folder of clips.
- In the right panel, select the Video tab and choose MP4 as the output format.
- Click the settings gear to open Custom Settings. Set the encoder to H.264. Match the source resolution and frame rate exactly.
- Adjust the bit rate if needed — for 1080p footage, 8–16 Mbps preserves quality well for editing. For 4K, 25–50 Mbps is a reasonable range.
- Save the configuration as a preset — for example, “Premiere-Ready H.264” — for consistent reuse across projects.
- Click Convert or Convert All for batch processing. Monitor real-time progress in the dashboard.
- Once complete, find your converted files in the Finished tab and import them into Premiere Pro.
Tip: Do not change the frame rate during conversion. A mismatch between source and output frame rate causes audio drift over longer clips. Always set frame rate to “Same as source” or match it manually.
Using HandBrake (free alternative):
- Open HandBrake and add your MP4 file.
- Under Video, set the codec to H.264 (x264).
- Set Quality (RF) to 18–20 for near-lossless output.
- Under Video, set Framerate to Same as source.
- Click Start Encode.
HandBrake works well for single files. For batch conversion of multiple clips, TotalMedia VideoConverter handles folder-level processing more efficiently.
Cause 2: The File Is Not Actually an MP4
When the Extension Lies
A file named video.mp4 is not guaranteed to contain standard MP4-compatible content. Several scenarios produce files with an .mp4 extension that Premiere Pro cannot open:
- Screen recorders sometimes export in formats like FLV or WebM wrapped in an .mp4 container.
- Downloaded files from certain platforms may be packaged in unusual container formats despite showing an .mp4 extension.
- Converted files from unreliable tools may write broken or non-standard container headers.
How to Check What Is Actually Inside the File
MediaInfo is a free tool that reveals the exact codec, container, bit rate, and encoding details of any video file. Download it at mediaarea.net/en/MediaInfo.
Open your MP4 in MediaInfo. If the codec listed is anything other than H.264 or H.265 — for example, VP9, AV1, or MPEG-2 — that is your import problem. Convert it to H.264 MP4 using TotalMedia VideoConverter or HandBrake before importing into Premiere.
If the container itself is non-standard, change the output container to MP4 during conversion.
Cause 3: Corrupted MP4 File
Signs Your File Is Corrupted
A corrupted MP4 behaves differently from a codec issue:
- The file either does not import at all, or imports with a duration of zero.
- Premiere shows a generic error with no codec reference.
- The file plays in no media player — not VLC, not Windows Media Player, not QuickTime.
- The file was interrupted during recording (dead battery, crash, abrupt shutdown) or during transfer.
Fix 3A: Try VLC First
VLC Media Player has a built-in repair function for MP4 files. Open VLC, go to Media > Convert/Save, add the file, and let VLC attempt to read and re-mux it. If VLC can play it but Premiere cannot, the issue is codec-based, not corruption. Return to Cause 1.
If VLC cannot play it either, the file is likely corrupted at the container or data level.
Fix 3B: Dedicated Repair Tools
For genuinely corrupted MP4 files, a dedicated repair tool is the right next step. Two commonly used options:
- Stellar Repair for Video — handles MP4 files with broken headers, incomplete recordings, and transfer errors. Paid tool with a free preview of repaired footage before purchase.
- Grau GmbH Video Repair — specifically designed for MP4 and MOV files recorded by cameras. Requires a reference file (a healthy file from the same camera) for best results.
Neither of these is a format conversion tool. They reconstruct the container structure of damaged files. Once repaired, import the file into Premiere or convert it to H.264 if codec issues persist.
Important: Always work on a copy of the corrupted file, never the original. Repair tools occasionally fail or produce partial output.
Premiere Pro Codec Error Messages and What They Mean
| Error Message | Most Likely Cause | Fix |
|---|---|---|
| “File importer plug-in failure” | Codec not supported or missing | Install HEVC extensions or convert to H.264 |
| “Unsupported compression type” | Non-standard codec inside MP4 | Check with MediaInfo, convert to H.264 |
| “Could not find any capable video play modules” | Missing codec or GPU issue | Enable GPU acceleration or convert format |
| “File seems corrupted or unsupported” | Corrupted file or unusual container | Try VLC repair first, then dedicated repair tool |
| Imports but plays as black screen | H.265 without hardware support | Enable GPU acceleration or convert to H.264 |
| Imports but audio only, no video | Codec mismatch between video and audio tracks | Re-mux or convert with TotalMedia VideoConverter |
Preventing the Problem Before It Starts
The fastest fix is avoiding the issue on the next shoot.
Set your camera to record H.264. Most cameras that offer H.265 also offer H.264 as an alternative. H.265 offers better compression but H.264 offers universal compatibility. For editing workflows where file size is not the primary constraint, H.264 is the more practical choice.
Test your workflow before a critical shoot. Record a short test clip and confirm it imports correctly into your version of Premiere before committing to a full day of H.265 recording.
Keep a conversion preset ready. If you regularly work with H.265 footage, save a conversion preset in TotalMedia VideoConverter — for example, “Premiere-Ready H.264” — so converting a new batch of clips takes seconds, not configuration time.
FAQ
The most common cause is an unsupported codec inside the MP4 container, typically H.265 (HEVC). Premiere Pro requires either hardware GPU support or the HEVC Video Extensions codec pack on Windows to handle H.265 files. Converting the file to H.264 using a tool like TotalMedia VideoConverter or HandBrake resolves the issue in most cases.
A black screen on import usually means Premiere cannot decode the video codec using your current hardware or settings. Enable GPU acceleration under File > Project Settings > General, or convert the file to H.264 which does not require hardware decoding support.
Premiere Pro has supported H.265 since version CC 2015.3, but hardware acceleration quality and reliability have improved significantly in later versions. If you are on an older version, updating Premiere Pro alongside installing HEVC Video Extensions on Windows offers the best H.265 compatibility without converting.