Google Drive’s Upload and Storage Limits Explained
Before compressing anything, it helps to know exactly which limit you are hitting. Google Drive has two distinct constraints that affect video uploads — and they are not the same thing.
Free Tier (15GB)
Every Google account includes 15GB of free storage shared across Google Drive, Gmail, and Google Photos. A single high-resolution video file can consume a significant portion of that limit — or exceed it entirely. A one-hour 4K video at high bitrate can run 10–20GB on its own.
Google One Plans
Google One upgrades extend your storage beyond the free 15GB:
| Plan | Storage | Monthly Cost (US) |
|---|---|---|
| Free | 15 GB | $0 |
| Basic | 100 GB | $1.99 |
| Standard | 200 GB | $2.99 |
| Premium | 2 TB | $9.99 |
| Higher tiers | Up to 30 TB | Varies |
If you regularly store or share large video files, a Google One upgrade is worth considering alongside compression. But if you need to share a specific file now — or you are approaching your limit and cannot upgrade — compression is the immediate fix.
Google Workspace
Google Workspace accounts (business and education) have different storage allocations depending on the plan — ranging from pooled storage across users to effectively unlimited on higher-tier enterprise plans. Individual file upload size is capped at 5TB per file across all Google Drive account types, so the file size limit itself is rarely the issue. Storage quota is almost always what gets in the way.
The key distinction: Google Drive does not have a per-file upload size limit that most users will realistically hit (5TB is very high). The problem is almost always total storage quota — your Drive is full or nearly full, and a large video file pushes it over the edge. Compressing the video reduces how much of your quota it consumes.
Why Video Files Are So Large — and Where Size Actually Comes From
Understanding what makes a video file large tells you exactly where to cut without damaging what matters.
Three variables drive video file size:
Bitrate is the most important lever. It measures how much data is processed per second of video. A file recorded at 50 Mbps for one hour produces roughly 22GB. Drop that to 8 Mbps and the same one-hour video is about 3.6GB — with visually comparable quality for most content types.
Resolution determines how many pixels are in each frame. 4K (3840×2160) contains four times as many pixels as 1080p. Higher resolution means more data per frame, which means a larger file. Dropping from 4K to 1080p reduces file size dramatically — but also reduces the maximum display quality.
Codec determines how efficiently that data is compressed before it hits your storage. H.264 is the current standard for compatibility. H.265 (HEVC) achieves roughly the same visual quality at about half the file size — but with slower encoding and reduced compatibility on older devices.
For Google Drive uploads specifically, the goal is almost always reducing bitrate rather than dropping resolution or changing codec. Bitrate reduction produces the largest file size savings with the least perceptible quality impact.
Method 1: TotalMedia VideoConverter AI Compressor (Recommended)
TotalMedia VideoConverter’s Compressor module is purpose-built for exactly this use case — reducing file size while preserving visual quality, with a real-time preview of the output size before you commit to the encode.
The AI compression engine analyzes your video and determines optimal settings automatically. You do not need to know what bitrate or codec to set. You select a target, preview the result, and compress.
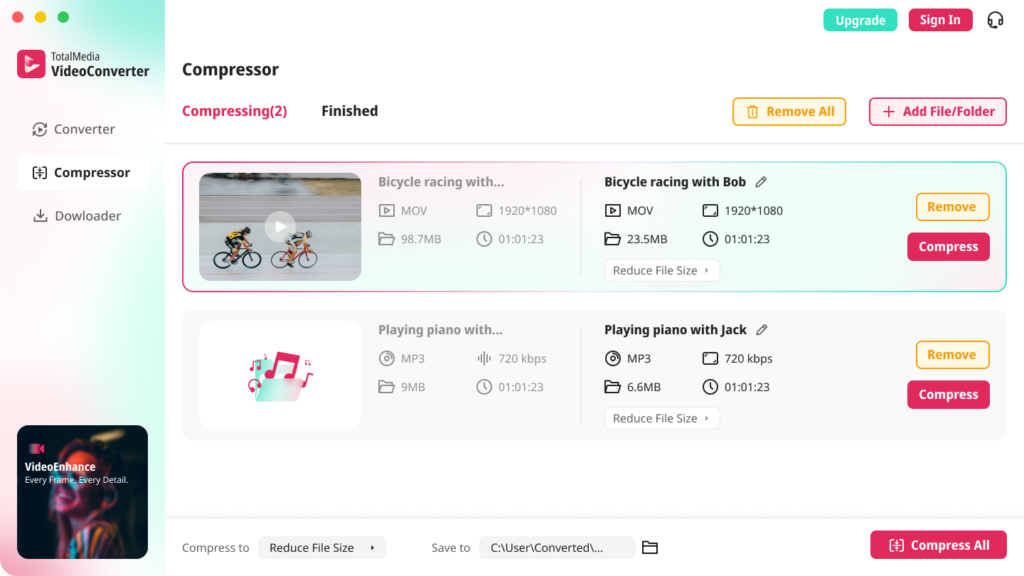
Step-by-step: AI compression for Google Drive
- Open TotalMedia VideoConverter and click Compressor in the left sidebar.
- Click + Add File for AI Compression and select your video file. For multiple videos, click + Add File/Folder to add an entire folder at once.
- At the bottom, open the Compress to dropdown and select Reduce File Size.
- Check the real-time file size preview — the app shows your predicted output size before encoding begins. If the preview size still exceeds your available Drive quota, you can adjust settings further before committing.
- Set your output folder via Save to.
- Click Compress for a single file or Compress All for a batch.
- Monitor real-time progress in the dashboard.
- When complete, open the Finished tab to compare before and after file sizes side by side.
For users who want a specific target size
If you need the output to land under a precise file size — for example, under 1GB to fit within remaining Drive quota — use the Converter module instead of the Compressor for manual bit rate control:
- Click Converter in the left sidebar.
- Add your file and select MP4 as the output format.
- Click the settings gear to open Custom Settings.
- Set the encoder to H.264 and manually enter your target bit rate. Use the formula: Target file size (MB) × 8 ÷ duration (seconds) = required bit rate (Mbps). For example, a 1GB target for a 30-minute video: 1000MB × 8 ÷ 1800s ≈ 4.4 Mbps.
- Save the configuration as a named preset for future uploads.
- Click Convert All and monitor progress in real time.
<!– CTA BANNER PLACEHOLDER –> <!– Insert TotalMedia VideoConverter promotional banner here –> <!– Recommended dimensions: 1200×300px or 16:5 ratio –> <!– Link to: https://www.totalmedia.com/videoconverter –> <!– Alt text suggestion: “Compress video for Google Drive with TotalMedia VideoConverter — see the file size before you encode” –>
Method 2: HandBrake (Free, Precise Bit Rate Control)
HandBrake is the best free option when you need to hit a specific file size target. Its average bitrate mode lets you set an exact target bitrate and produce output that reliably lands close to your intended size.
Best settings for Google Drive compression:
- Open HandBrake and add your video file.
- Under Output Settings, set format to MP4 and codec to H.264 (x264).
- Under Video, switch from Constant Quality (RF) to Average Bitrate.
- Enter your target bitrate. Use the same formula above to calculate the right value for your file size target.
- Enable 2-Pass Encoding — this significantly improves file size accuracy. Single-pass encoding estimates; two-pass measures. The extra encoding time is worth it when hitting a specific size matters.
- Set Framerate to Same as source.
- Choose your output destination and click Start Encode.
When to use HandBrake over TotalMedia VideoConverter: HandBrake is the right choice when you need to guarantee a specific output size and are comfortable calculating target bitrates manually. For users who want AI-assisted compression with a visual size preview before encoding, TotalMedia VideoConverter removes that guesswork entirely.
Method 3: Reduce Resolution Before Uploading
If bitrate reduction alone does not get your file small enough — or if the compressed quality is not acceptable at your required file size — dropping resolution is the next lever.
Practical resolution targets for Google Drive uploads:
| Source Resolution | Compressed Target | Approximate Size (1 hr, H.264) | When to Use |
|---|---|---|---|
| 4K (3840×2160) | 1080p (1920×1080) | ~3.5 GB at 8 Mbps | Sharing recordings, presentations |
| 4K | 720p (1280×720) | ~1.8 GB at 4 Mbps | Archiving, casual sharing |
| 1080p | 720p | ~900 MB at 2 Mbps | Tight storage quota |
| 1080p | 480p | ~450 MB at 1 Mbps | Maximum compression, acceptable quality |
To change resolution in TotalMedia VideoConverter, open Custom Settings in the Converter module and set your target resolution under the Video Settings panel. For HandBrake, change the resolution under the Dimensions tab.
Dropping resolution is a one-way process — the discarded pixel data cannot be recovered. Always keep the original file before downscaling.

Method 4: Google Drive’s Built-In Video Processing
Google Drive does not compress video files on upload. It processes them for in-browser streaming but stores the original file at its original size. Uploading a large file does not make it smaller — it just occupies your quota at full size.
There is no built-in compression on Google’s side. Compression must happen before upload.
Practical File Size Targets for Common Google Drive Scenarios
| Scenario | Recommended Max Size | Suggested Settings |
|---|---|---|
| Sharing a short clip (under 5 min) | Under 200 MB | H.264, 1080p, 5 Mbps |
| Sharing a meeting or webinar recording (30–60 min) | Under 1 GB | H.264, 1080p, 2–3 Mbps |
| Archiving a long video (1–3 hours) | Under 2 GB | H.264, 1080p, 2 Mbps |
| Sending a video for review (any length) | Under 500 MB | H.264, 720p, 2 Mbps |
| Backing up a large video library | Maximize compression | AI Compressor, Reduce File Size preset |
Tips for Keeping Google Drive Video Sizes Manageable Long-Term
Trim before compressing. Remove dead air, countdowns, and long pauses from recordings before compressing. Shorter source file equals smaller output — and you are not compressing footage you would have cut anyway.
Set a recording bit rate from the start. Screen recorders, webcams, and video editing export settings all let you control output bit rate. Setting a sensible bit rate at capture — rather than recording at maximum quality and compressing later — reduces the compression workload significantly.
Use shared drives for large projects. If you are on a Google Workspace plan, shared drives pool storage across your organization. Large project files may be better stored there than in personal Drive storage.
Check what else is consuming your quota. Gmail attachments and Google Photos both share your Drive storage. Before compressing video files, verify that Drive itself is not filling up with old email attachments or backed-up phone photos. Clearing those may free enough space without requiring video compression at all.
FAQ
Google Drive does not impose a meaningful per-file size limit for most users — the maximum individual file size is 5TB. The real constraint is your total storage quota: 15GB on the free plan, or more with a Google One subscription. Large video files consume quota quickly, which is why compression is necessary before uploading rather than as a requirement of the upload itself.
Use TotalMedia VideoConverter’s AI Compressor module. Add your video, select the Reduce File Size preset, and check the real-time file size preview before encoding. The AI engine reduces file size while preserving visual quality. For manual control, use HandBrake with H.264 codec and average bitrate mode set to 2–8 Mbps depending on your target file size.
Use this formula: Target file size in MB × 8 ÷ video duration in seconds = required bitrate in Mbps. For example, to fit a 45-minute video under 1GB: 1000 × 8 ÷ 2700 = approximately 3 Mbps. Set this as the target bitrate in HandBrake’s average bitrate mode or in TotalMedia VideoConverter’s Custom Settings panel.