Can You Upload MKV Files to YouTube?
Yes — YouTube accepts MKV files directly. You can drag an MKV into YouTube Studio and it will upload and process without any conversion step. No error message. No format rejection.
That said, “YouTube accepts it” and “YouTube handles it optimally” are two different things. What happens behind the scenes during processing — and how long it takes — depends heavily on what is inside your MKV file and whether it aligns with YouTube’s preferred encoding specifications.
The short answer: Upload MKV directly if you need speed and your file already meets YouTube’s recommended specs. Convert to MP4 first if you want faster processing, better initial quality, and full control over the output YouTube receives.
What YouTube Actually Does With Your MKV File
When you upload any video to YouTube — MKV, MP4, MOV, or otherwise — YouTube re-encodes it. Every uploaded file gets transcoded into multiple versions: 360p, 480p, 720p, 1080p, and 4K where applicable. YouTube controls this process entirely on its end.
What you upload is the source YouTube works from. The closer your upload is to YouTube’s preferred source format, the faster and more accurately YouTube can transcode it.
MKV is a flexible container that can hold almost any codec. YouTube’s transcoding pipeline is optimized for H.264 and H.265 video in MP4 containers — the formats it sees most frequently. When an MKV arrives containing H.264 video, YouTube handles it well. When an MKV contains VP9, AV1, or less common codecs, YouTube’s processing takes longer and initial quality results can be inconsistent.
What this means practically:
- MKV with H.264 video → uploads and processes similarly to MP4, minor difference
- MKV with H.265 video → generally handles well, slightly slower processing
- MKV with VP9, AV1, or MPEG-2 → longer processing, less predictable initial quality
- MKV with multiple audio tracks or complex subtitle streams → may cause processing delays or audio issues
YouTube’s Recommended Upload Specifications
YouTube publishes recommended encoding settings for uploads. Meeting these specifications — regardless of container format — produces the fastest processing and best initial quality.
| Setting | Recommended Value |
|---|---|
| Container | MP4 (recommended), MKV (accepted) |
| Video codec | H.264 |
| Audio codec | AAC-LC |
| Frame rate | Match source (24, 25, 30, 48, 50, 60 fps) |
| Bit rate (1080p SDR) | 8 Mbps (standard) / 12 Mbps (60fps) |
| Bit rate (4K SDR) | 35–45 Mbps (standard) / 53–68 Mbps (60fps) |
| Color space | Rec. 709 for SDR / Rec. 2020 for HDR |
| Scan type | Progressive |
The container format (MP4 vs MKV) is less important than the codec inside it. An MKV file containing H.264 video at the correct bit rate will process similarly to an equivalent MP4. The advantage of MP4 is that it is YouTube’s explicitly recommended container — when in doubt, it is the safer choice.
When to Upload MKV Directly (No Conversion Needed)
Direct MKV upload makes sense in specific situations.
Your MKV already contains H.264 or H.265 video. Check with MediaInfo (available free at mediaarea.net/en/MediaInfo) before uploading. If the codec is H.264 or H.265, the transcoding pipeline handles it cleanly and conversion offers minimal benefit.
You are uploading a single file and time is not a concern. For one-off uploads where processing time does not matter, skipping conversion saves a step without meaningful downside.
The MKV is already at YouTube’s recommended bit rate. If your file is already encoded at 8–12 Mbps for 1080p or 35–68 Mbps for 4K, YouTube has a clean source to work from regardless of container.
You want to preserve the original file exactly. Some content creators prefer uploading the original file to avoid any generation loss from re-encoding before YouTube’s own transcoding.
When to Convert MKV to MP4 Before Uploading
Converting to MP4 before uploading is the better choice in these situations.
Your MKV contains VP9, AV1, or an unusual codec. These codecs slow down YouTube’s processing pipeline and can produce inconsistent initial quality. Converting to H.264 MP4 before uploading gives YouTube a clean, predictable source.
You are uploading multiple files in a batch. MP4 files process faster and more consistently in YouTube’s pipeline. For batch uploads, converting first reduces the chance of one file holding up the queue.
The MKV has multiple audio tracks or embedded subtitles. YouTube may mishandle complex MKV streams. Converting to a clean single-audio-track MP4 eliminates this risk.
You need the video live and at full quality quickly. YouTube initially serves a lower-quality version while it processes the full resolution. A clean H.264 MP4 upload typically reaches full quality faster than an MKV upload with a non-standard codec.
The MKV file is very large. Converting to an H.264 MP4 at YouTube’s recommended bit rate reduces file size without quality loss — making upload faster on any connection speed.
How to Upload MKV to YouTube Directly
If your MKV meets YouTube’s specs and you want to skip conversion:
- Go to YouTube Studio at studio.youtube.com and sign in.
- Click Create > Upload Videos in the top right.
- Drag your MKV file into the upload window or click Select Files.
- Fill in your title, description, tags, and thumbnail while the file uploads.
- Set visibility to Private or Unlisted initially — check quality before publishing publicly.
- Once processing completes, watch the video at full resolution and confirm quality before changing visibility to Public.
Tip: YouTube processes lower resolutions first and higher resolutions later. A 4K MKV may show only 360p or 720p options immediately after upload. Full 4K processing typically completes within 30 minutes to a few hours depending on file size and platform load. Check back before assuming there is a quality problem.
How to Convert MKV to MP4 for YouTube Before Uploading
Using TotalMedia VideoConverter
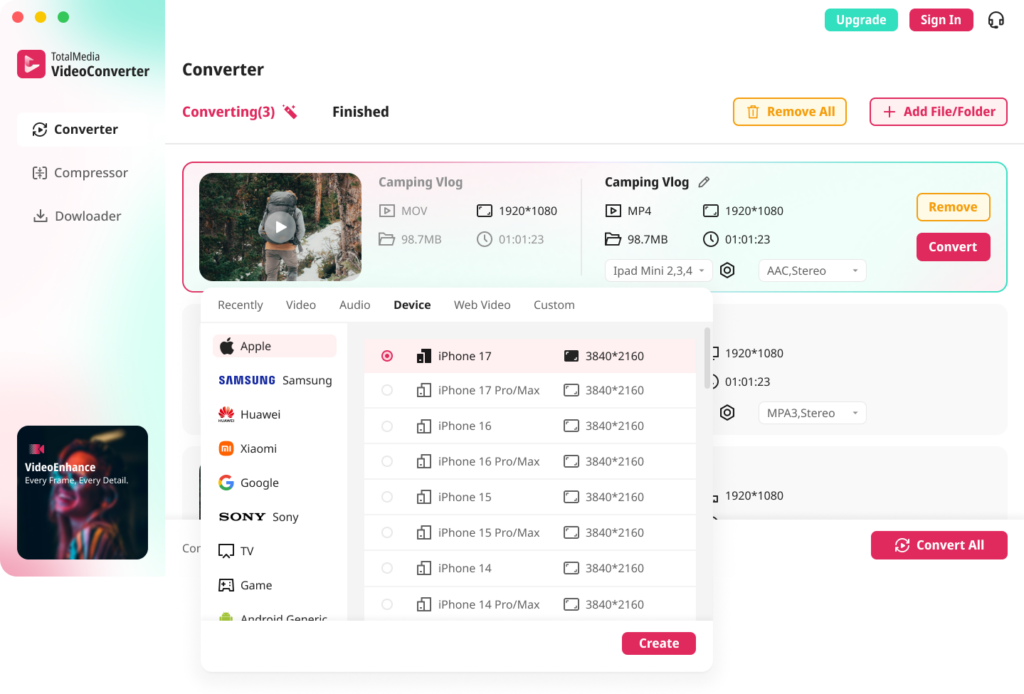
TotalMedia VideoConverter includes a dedicated YouTube web preset that applies optimized settings automatically — no manual bit rate or codec configuration needed. It runs on both Mac and Windows.
Step-by-step:
- Open TotalMedia VideoConverter and click Converter in the left sidebar.
- Click + Add File/Folder and select your MKV file or an entire folder of MKV files for batch conversion.
- In the right panel, click the Web Video tab.
- Select the YouTube preset. This applies YouTube-optimized codec, bit rate, and container settings automatically.
- For manual control, click the settings gear to open Custom Settings. Set encoder to H.264, resolution to match your source, frame rate to Same as source, and bit rate to 8–12 Mbps for 1080p or 35–45 Mbps for 4K.
- Save the configuration as a named preset — for example, “MKV to YouTube MP4” — for consistent reuse.
- Set your output folder via Save to and click Convert All.
- Monitor real-time progress in the dashboard. Find converted files in the Finished tab when complete.

Using HandBrake (Free Alternative)
- Open HandBrake and add your MKV file via Open Source.
- Under Output Settings, set format to MP4 and codec to H.264 (x264).
- Under Video, set Framerate to Same as source.
- Set Quality (RF) to 18–20 for near-lossless output, or switch to Average Bitrate and enter your target bit rate for precise file size control.
- Under Audio, set the output codec to AAC at 192–320 kbps.
- Choose your output destination and click Start Encode.
Using FFmpeg (Command Line)
For users comfortable with Terminal or Command Prompt:
Convert MKV to YouTube-ready MP4:
ffmpeg -i input.mkv -vcodec libx264 -b:v 8000k -acodec aac -b:a 192k -movflags +faststart output.mp4
The -movflags +faststart flag moves the MP4 metadata to the beginning of the file — this allows YouTube to begin processing before the full file is read, slightly improving upload handling.
Re-containerize without re-encoding (if MKV already contains H.264):
ffmpeg -i input.mkv -vcodec copy -acodec aac -movflags +faststart output.mp4
This is near-instant — only the container changes, the video stream is untouched. Use this when MediaInfo confirms H.264 video and you want zero generation loss.
Batch convert a folder of MKV files:
for f in *.mkv; do ffmpeg -i "$f" -vcodec libx264 -b:v 8000k -acodec aac -movflags +faststart "${f%.mkv}.mp4"; done
MKV vs MP4 for YouTube: Side-by-Side Comparison
| MKV (Direct Upload) | MP4 (H.264, Converted) | |
|---|---|---|
| YouTube accepts it | Yes | Yes |
| Processing speed | Slower for non-H.264 codecs | Fastest |
| Initial quality consistency | Variable by codec | Consistent |
| File size control | Limited without converting | Full control |
| Multiple audio tracks | May cause issues | Clean single track |
| Subtitle stream handling | May cause delays | No subtitle stream |
| Recommended by YouTube | No | Yes |
| Best for | Single H.264 MKV uploads | All scenarios, batch uploads |
Common MKV YouTube Upload Problems and Fixes
Upload completes but video is stuck processing: YouTube’s pipeline is likely struggling with the codec inside the MKV. Check the codec using MediaInfo. If it is VP9, AV1, or MPEG-2, convert to H.264 MP4 and re-upload.
Video uploads but audio is missing or wrong: The MKV likely contained multiple audio tracks — DTS, TrueHD, or a non-AAC format. YouTube may have selected the wrong track or failed to decode it. Convert to MP4 with a single AAC audio track before re-uploading.
Video quality looks poor right after upload: YouTube processes lower resolutions first. Wait 30–60 minutes after upload and check again. If quality is still poor after that window, the source bit rate may be too low — re-encode at a higher bit rate and re-upload.
Upload is extremely slow: Large MKV files with high bit rates take longer to upload. Convert to H.264 MP4 at YouTube’s recommended bit rate first — this reduces file size without quality loss and cuts upload time significantly.
YouTube shows “Video is being processed” for hours: Extended processing times almost always indicate an unusual codec or complex stream inside the MKV. Convert to H.264 MP4, delete the stuck upload, and re-upload the converted file.
FAQ
Yes. YouTube accepts MKV files directly alongside MP4, MOV, AVI, and several other formats. However, YouTube’s processing pipeline is optimized for H.264 video in an MP4 container. MKV files containing H.264 process smoothly. MKV files with less common codecs like VP9 or AV1 may process slowly or produce inconsistent initial quality.
It depends on what is inside your MKV. If MediaInfo confirms your MKV contains H.264 video and AAC audio, direct upload is fine. If the video codec is VP9, AV1, MPEG-2, or anything other than H.264 or H.265, convert to H.264 MP4 before uploading for faster processing and better quality consistency.
Extended processing time almost always comes from the codec inside the MKV rather than the container itself. VP9, AV1, and MPEG-2 codecs slow YouTube’s transcoding pipeline. Convert to H.264 MP4 using TotalMedia VideoConverter or HandBrake, then re-upload for faster and more consistent processing.
HandBrake is the best free option. Open your MKV file, select H.264 MP4 as the output, set framerate to Same as source, quality to RF 18–20, and audio to AAC. For batch conversion with a dedicated YouTube preset and real-time file size preview, TotalMedia VideoConverter offers a free tier on both Mac and Windows.
-movflags +faststart flag make a difference for YouTube uploads? It can help. The faststart flag moves MP4 metadata to the beginning of the file, allowing YouTube’s upload system to begin reading the file structure before the full upload completes. For large files on slower connections, this can modestly improve upload handling. It has no effect on final video quality.
Disclaimer: YouTube’s supported formats, processing behavior, and recommended specifications are subject to change with platform updates. Verify current YouTube upload specifications at support.google.com/youtube before committing to a large batch conversion workflow. Information in this article is accurate as of the date of publication.