
Most videographers put enormous effort into the edit. The delivery gets five minutes of thought at the end. That imbalance shows — in confused clients, revision requests caused by wrong formats, and professional relationships that don’t lead to referrals.
A video delivery workflow is the system that takes your finished edit from your hard drive to the client’s hands, correctly, every time. It’s not glamorous. It’s what separates a professional operation from a freelancer who’s figuring it out project by project.
Here’s how to build one.
What a Video Delivery Workflow Actually Is
A video delivery workflow is the end-to-end process that covers everything after the edit is approved — export, quality check, compression, file naming, transfer, and archiving. A final video has passed all approval stages. It meets technical specifications, includes approved corrections, and matches client expectations. It’s been color-corrected, audio-mixed, captioned if required, and exported in the agreed-upon formats. Final status means the client has signed off. It’s a deliverable ready for publication, broadcast, or distribution.
The delivery workflow answers three questions for every project: what files does the client receive, in what format, and how do they get them. Answering those three questions consistently — before production starts, not after — is what makes a workflow.

Step 1: Define Deliverables Before Production Starts
The most expensive mistake in video delivery happens at the beginning of a project, not the end. Establishing the requirements for deliverables at the very beginning of the project helps avoid last-minute surprises or additional work.
Before any camera rolls, confirm in writing:
Where is the video going? A corporate video for a website needs different specs than the same video on a trade show screen or broadcast TV. Each destination has different format, resolution, and bitrate requirements. Broadcasters require strict technical compliance: specific file formats and codecs, proper color space Rec.709, and audio levels at -23 LUFS for broadcast. Social media teams need something different entirely.
How many versions? Marketing teams need master files plus platform-specific versions: YouTube at 16:9 H.264, Instagram at 1:1 and 9:16, and LinkedIn at 16:9 with captions. A client who needs five versions and only receives one comes back with revision requests that aren’t actually revisions — they’re deliverables that should have been scoped upfront.
What aspect ratios? Vertical video at 9:16 dominates mobile platforms. Horizontal 16:9 serves YouTube, websites, and presentations. Square 1:1 works across the Instagram feed and Facebook. Deliver all versions as separate files, clearly labeled by aspect ratio.
Document all of this in the project brief and contract before production begins. What’s in scope. What triggers an additional charge. How many revisions are included. All of it.

Step 2: Build a Review and Approval System
Vague feedback delivered late is the primary bottleneck in most video workflows. Conflicting notes and late responses, often scattered across emails, Slack messages, and drives, are common workflow bottlenecks that lead to excessive revisions and delays. The solution is to centralize feedback by moving comments out of the inbox and directly onto the asset.
Two tools handle this well:
Frame.io is purpose-built for video review. Clients leave time-stamped, frame-accurate comments directly on the video. No more “the bit at around two minutes thirty” in an email thread. Platforms such as Frame.io allow instant uploads, reviews, and approvals of video drafts, eliminating the need for lengthy email chains and ensuring that files remain accessible to all stakeholders.
Vimeo Review works similarly for teams already using Vimeo for hosting. Upload a review link, the client comments directly on the timeline, you respond and resolve.
Regardless of tool, set clear review rules upfront. Limit reviewers to essential stakeholders in each round and clearly define who holds the final approval authority. One decision-maker per round. One round of revisions per cut stage — rough cut, fine cut, final cut. Additional rounds incur additional cost.
Embedding simple checklists at each review stage — “mood is on brand,” “audio levels meet spec,” “text appears in safe area” — helps reviewers provide focused feedback and sign off before the next stage begins.
Step 3: Export Correctly for Each Deliverable
Once the client approves the final cut, export settings determine whether the quality of your edit survives delivery.
The universal default for most client deliverables: MP4 with H.264 codec, AAC audio at 192kbps, constant frame rate matching the edit timeline. This plays on every device, uploads to every platform, and imports into any editing software for future use.
Platform-specific requirements to know:
| Destination | Format | Resolution | Frame Rate | Bitrate |
|---|---|---|---|---|
| YouTube | MP4 H.264 | 3840×2160 or 1920×1080 | Match source | 35–45 Mbps 4K / 8–12 Mbps 1080p |
| Instagram Feed | MP4 H.264 | 1080×1080 or 1080×1350 | 30fps | 3.5 Mbps minimum |
| Instagram Reels / TikTok | MP4 H.264 | 1080×1920 | 30fps | 5–8 Mbps |
| MP4 H.264 | 1920×1080 | 30fps | 5–10 Mbps | |
| Broadcast | As specified — typically MXF or MOV ProRes | 1920×1080 or 3840×2160 | As specified | High — confirm with broadcaster |
| Client archive master | MP4 H.264 or MOV | Highest available | Match source | 20–50 Mbps |
Export the master file first — full quality, full resolution. Then derive compressed platform versions from the master. Never compress the master file. Always keep it separately archived.
Step 4: Compress Delivery Files Without Killing Quality
A 20GB master file is not a client deliverable. Most clients can’t upload it, store it, or do anything practical with it.
Compression before delivery is part of the job. The goal is the smallest file that looks indistinguishable from the master at the client’s intended viewing size — usually a phone, laptop, or conference room display.
TotalMedia VideoConverter’s AI compression engine handles this in one step. Add the exported master file, preview the predicted output size before committing, and adjust the compression target until the size is right. The AI determines optimal settings rather than requiring manual bitrate calculation. For projects with multiple deliverables, batch compression processes the entire set in one session. The real-time file size preview removes the guesswork — you know the output size before rendering.
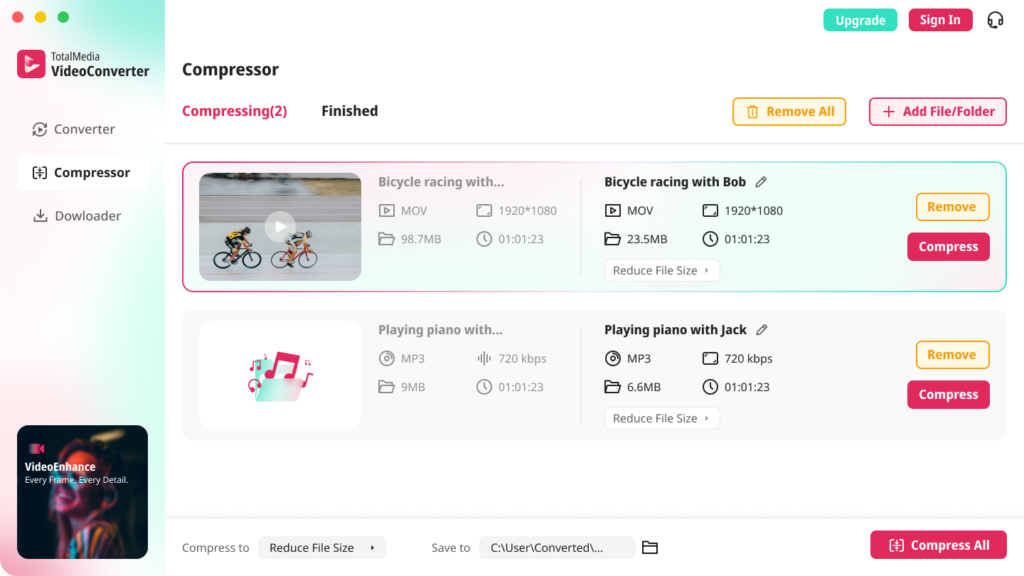
Keep the full-quality master archived separately. Deliver the compressed version. Both exist. Neither replaces the other.
Step 5: Name and Organize Files Correctly
File naming signals professionalism before the client opens a single file. A folder of files named EXPORT_FINAL_v3_REALLYFINAL.mp4 undermines confidence in everything inside it.
A consistent naming convention across all projects:
ClientName_ProjectType_AspectRatio_Resolution_Date
Examples:
AcmeCorp_BrandFilm_16x9_4K_2025-03AcmeCorp_BrandFilm_9x16_1080p_2025-03AcmeCorp_BrandFilm_1x1_1080p_2025-03
Include a README.txt file explaining the folder structure and listing all file formats and codecs. This supports creative collaboration by making assets accessible to future editors. Consistent structure across all projects reduces client questions and accelerates file transfer workflows.
Folder structure for a standard delivery package:
ClientName_ProjectName_Delivery/
├── Master/
│   └── ClientName_ProjectType_16x9_4K_Master.mp4
├── Delivery/
│   ├── ClientName_ProjectType_YouTube_4K.mp4
│   ├── ClientName_ProjectType_Instagram_9x16.mp4
│   └── ClientName_ProjectType_LinkedIn_1080p.mp4
└── README.txt
Clean. Self-explanatory. No questions needed.
Step 6: Choose the Right Transfer Method
How you send files matters as much as what you send. Pick a method and standardize it across all projects.
Frame.io handles review and delivery in one platform — clients download final files directly from the review link. Clean and professional. No separate transfer step needed.
Google Drive or Dropbox — create a dedicated folder per client, share with view and download permissions. Simple and familiar for most clients. Organize the folder structure before sharing so the client sees your naming convention, not a mess of files.
WeTransfer works for one-off large file transfers. Free tier links expire after seven days — use WeTransfer Pro for longer expiry on ongoing client relationships.
Avoid email attachments. They fail above a few MB and create version control problems when clients reply with feedback on the wrong file.
One important check: test the transfer link before sending it to the client. A broken link on final delivery day is a trust problem, not just a technical one.
Step 7: Archive Everything
The project isn’t finished when the client receives the files. It’s finished when the archive is complete.
Keep three things:
Raw footage. The original camera files. Irreplaceable. Store on at least two drives, one offsite or in cloud storage.
Project files. The editing timeline, color grade, and all associated assets. Keeps the project re-openable for future revisions without starting from scratch.
Final delivered files. The exact files the client received, named and organized as delivered. When a client comes back six months later needing a version for a new platform, you pull from the archive rather than re-exporting from the timeline.
The process does not end when the editor hits render. The final phase turns a single-use expense into a perpetually reusable asset, transforming the archive into a living library that generates ROI. For freelancers, that ROI is simpler — it’s the ability to handle client requests quickly without rebuilding work you’ve already done.
The Complete Delivery Workflow at a Glance
| Stage | Action | Tool |
|---|---|---|
| Pre-production | Confirm deliverables, formats, versions in contract | Contract, brief document |
| Review | Centralize client feedback with time-stamped comments | Frame.io or Vimeo Review |
| Export | Master file at full quality, then platform versions | Premiere Pro, DaVinci Resolve |
| Compression | Compress delivery files to practical sizes | TotalMedia VideoConverter |
| File naming | Apply consistent naming convention to all files | Standard template |
| Transfer | Deliver via agreed transfer method, test link first | Frame.io, Google Drive, Dropbox |
| Archive | Raw footage, project files, delivered files — all three | External drives plus cloud backup |
Frequently Asked Questions
A video delivery workflow is the system that covers everything after the edit is approved — export, quality check, compression, file naming, transfer, and archiving. It ensures every client receives the correct files, in the correct formats, through a consistent and professional process regardless of project size.
MP4 with H.264 codec and AAC audio is the correct default for most client deliverables. It plays on every device, uploads to every platform, and imports into any editing software. For broadcast delivery, confirm the broadcaster’s technical specifications — typically MXF or MOV ProRes with specific audio level requirements. For professional post-production handoffs, MOV at high bitrate is more appropriate.
Keep raw footage and project files for a minimum of 30 to 60 days after final delivery and client sign-off. Keep final delivered files for at least 12 months. For wedding and event work, many videographers keep master files for several years given the irreplaceable nature of the footage. Communicate your file retention policy to clients upfront — it’s a professional detail most clients appreciate knowing.